The Running Fix
Reading almost any book on coastal navigation leaves most people with the impression that the running fix is not used much. This can not be further than the truth.
Important to Coastal Navigation
I find that while navigating along a coastline, the opportunity to complete a running fix presents itself more often than being able to obtain a two or three bearing fix. Once taken, a bearing to an object is later be “advanced” in time and compared with a new bearing of the same or a different object providing a fix. This new bearing can then be advanced to compare with another object coming into view later.
Over time, if only one object at a time is in view, you are still able to fix your location.
Essential to Celestial Navigation
On top of this, when you move on to celestial navigation techniques, you are going to find that the foundation is the running fix. You may be able to get a celestial fix using three celestial objects (e.g. sun, moon, and a star), however, more often than not you will get an LOP from a morning sun sight, followed by LOPs derived from noon and afternoon sun sights. “Advancing” the earlier sights to the time of the most recent one is what gives you your location.
How Does it Work
- While on your course, take a bearing of an object
- Plot the bearing on your chart
- Continue on course for a period of time (let’s say 30 min)
- Take a second bearing of an object (could even be the same object)
- Calculate the distance traveled between bearing 1 and bearing 2 (at 5 knots for 30 mins, distance equals 2.5 miles)
- Advance the first bearing line 2.5 miles along your course line (yes, this is where it seems to get hard. Don’t worry.)
- Plot the second bearing.
- The location where the advanced bearing and the second bearing cross is your fix location
Let’s See It
If you are anything like me, that list doesn’t quite explain everything. So, we will set it up visually.
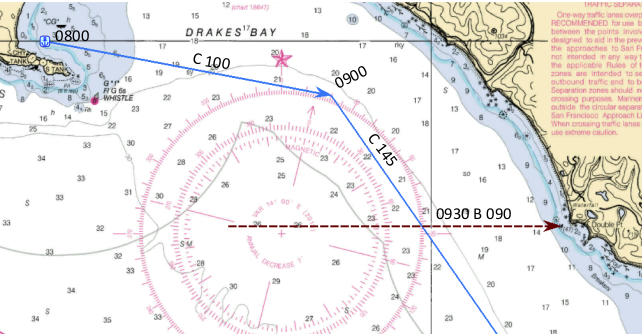
It is 0800 and you are leaving your anchorage at Drakes Bay in the fog.
To stay well clear of the Point Reyes shoreline, you plan a course of 100T, which you intend to follow for 5 miles. Traveling at an estimated 5 knots, your follow the 100T course for 1 hour then turn to 145T keeping an appropriate DR plot.
At 0930, while on a course of 145T, the fog lifts and Stormy Stack becomes visible. A bearing of 090T is obtained and plotted on the chart. See the brown dashed line.
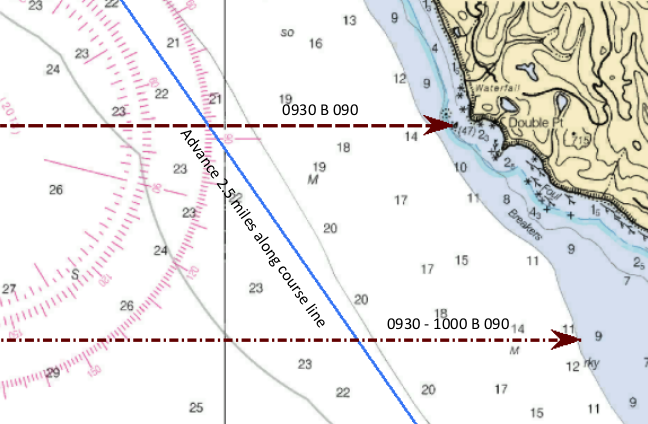
Continue on your course
At 1000, 30 minutes later, take a new bearing of Stormy Stack. In this case, 035T, but don’t do anything with it yet.
Advance the First Bearing
This is the part that seems tricky, but really isn’t. Estimate how far you have travelled between the 0930 and 1000 bearings. In this case, at 5 knots for 30 minutes, approximately 2.5 miles.
Measure along the course line 2.5 miles from where the 0930 bearing crosses. Plot a line parallel to the 0930 bearing line, making it pass through the spot you just located 2.5 miles along the course line. See the brown dot/dash line
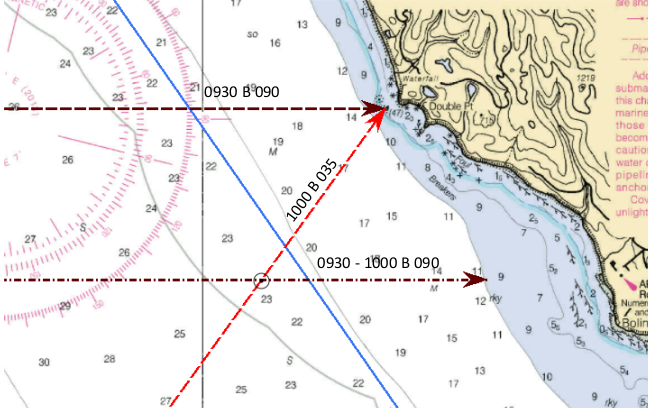
Almost There!
Plot the new 1000 (035T) bearing to Stormy Stack. Shown here as a red dashed line.
Your fix location is at the intersection of the new bearing line (labeled 1000 B 035) and the advanced bearing line (labeled 0930-1000 B 090).
An Important Note
You may notice the only part of the DR plot used is the course line! Do not confuse yourself with trying to make your DR times and DR positions a part of the running fix. They are not needed, and only make things more difficult.
Along the Way
While this running fix was taking place, a couple of other important navigation tasks could have been performed.
- When the first bearing was taken at 0930, an Estimated Position could have been figured.
- At the 1000 Running Fix, it would be logical to calculate Set and Drift.
A More Complex Example
You don’t always have the luxury of sailing in a straight line long enough to complete a running fix. Fortunately, the process works even with changes in course and speed.
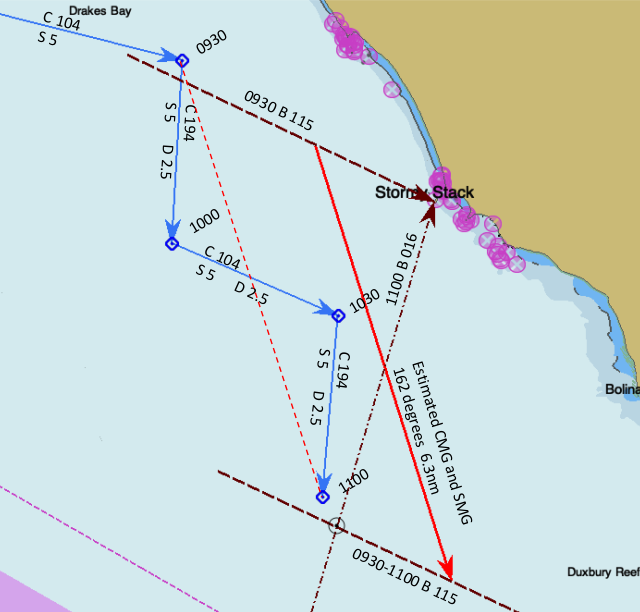
In this example, a bearing to an object was taken at 0930, simultaneously with a change in course. A DR position was plotted at the time, as well as the bearing LOP (brown dashed line). Other course changes were made at 1000 and 1030. In each case, a DR was plotted.
At 1100 a second bearing of the same object was made and plotted (brown dot-dash line).
To advance the 0930 bearing, measure the course and distance from the 0930 DR to the 1100 DR (dashed red line) to come up with course made good (CMG) and speed made good (SMG). In this case 162T and 6.3nm.
Starting from any point on the original 0930 LOP, plot a line 6.3nm long at 162 degrees (solid red line). Advance the 0930 LOP forward to the end of this line. You now have your running fix.
To improve the accuracy of this fix, an estimated position could have been determined at 0930 and at 1100. The CMG and SMG would then be determined based on the estimated positions.
One Last Thought
Over or under estimation of boat speed results in inaccuracies in the running fix. Fortunately, while a running fix is subject to error the error is not large. It is considered a good position fix.
Remember to “reset” your DR plot once the fix is established.